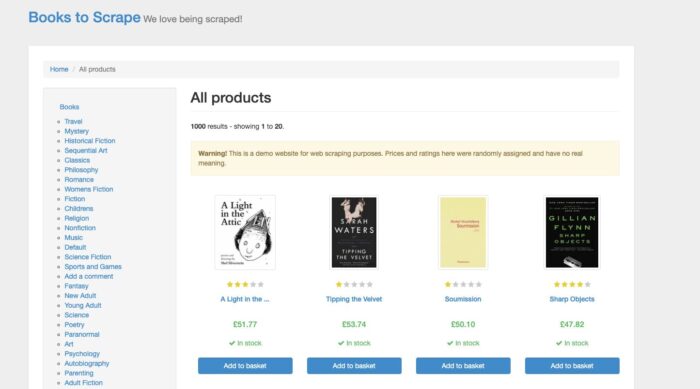
If you’re into web scraping with Python, you’re in a right place. Today we’ll see how to create your first python scraper with Scrapy, with some useful tricks and tips. The target website will be books.toscrape.com, a website created ad hoc for testing your scrapers.

What is Scrapy
Scrapy is an open-source Python application framework designed for creating programs for web scraping with Python.
It became the de-facto standard for web scraping in Python for its capability to handle options peculiar to web scraping, like the adherence to the robots.txt file, and the throttling of the requests or changes in their User Agent.
Some of the key features are:
- support for extracting data with XPATH or CSS selectors
- an interactive shell console to test your scraper live
- exporters in common formats like CSV, JSON, and more
- a telnet console for debugging purposes
Installation
In one of the next posts, we’ll see how to create a complete environment for web scraping with all the software needed for headful browsers and headless. For the purpose of this post, we can use the official Scrapy guide for its installation.
Target Analysis
books.toscrape is a simple website created for web scraping purposes and it mimics a classic e-commerce website selling books, of course.
The data we can scrape is the typical one we can find in every e-commerce. For this test we will extract:
- Title
- Image URL of the book
- UPC
- Product Type
- Price Tax Excluded
- Price Tax Included
- Availability
- Number of reviews
- Description
All these pieces of information can be found in the plain HTML of the product page, so a simple Scrapy installation should do the work.
Let’s start then.
Creating the Scrapy project
A Scrapy project is a folder containing a set of files needed for running a Scrapy spider.
Running the following command on your command line, these files will be created.
scrapy startproject bookstoscrape
A folder called bookstoscrape will be created with a bunch of files in it
- scrapy.cfg: containing the general project settings
- bookstoscrape folder, containing itself the following files:
- items.py: we will declare here the structure of the output we desire
- middlewares.py: where we can declare Downloader or Spider middlewares
- pipelines.py: where we can manipulate data after an item has been scraped
- settings.py: the key file for handling most of the configuration of the scraper, like throttling, user agent and so on.
- spider folder: where scrapy will place our scraper
To have a better understanding of the purpose of the different files, you can have a look at this post, where we summarized the Scrapy architecture, or, if you want to dig deeper, to the official documentation.
For this basic scraper, we’ll see in detail 2 of these files: items.py and settings.py
items.py
In this file, we will declare the fields of the output items we desire as output and that we’ve already seen in the target study phase.
The class will look like the following:
import scrapy

class BookstoscrapeItem(scrapy.Item):
# define the fields for your item here like:
# name = scrapy.Field()
title = scrapy.Field()
imageurl = scrapy.Field()
upc = scrapy.Field()
producttype = scrapy.Field()
pricenotax = scrapy.Field()
pricewithtax = scrapy.Field()
availability = scrapy.Field()
reviewsnum = scrapy.Field()
description = scrapy.Field()
pass
Basically, we are declaring the metadata of our scraper’s output but are not enforcing any rule on how these fields should be populated or which values are accepted or not.
In general, as a best practice, I usually don’t add any logic or type declaration in the scraper level, since all the data cleaning and validation are performed at a later stage, typically on a database.
If you need the output to be cleaned or validated, these rules should be enforced in the pipelines.py file.
settings.py
This is the main file where to configure the scraper and only a few of the hundreds of options available are shown when it is initialized. You can find the list of all the default settings for web scraping with Python on the Scrapy GitHub repository, but let’s have a look at the most used ones.
First of all, we have the User Agent, in this example we’ll mimic a Chrome browser installed on a Mac desktop scraping the target website, so it will become like the following.
USER_AGENT = 'Mozilla/5.0 (Macintosh; Intel Mac OS X 10_15_7) AppleWebKit/537.36 (KHTML, like Gecko) Chrome/105.0.0.0 Safari/537.36'
Next we have the flag to allow or disallow the adherence to robots.txt file. Let’s keep it set to True and see what will happen.
ROBOTSTXT_OBEY = True
CONCURRENT_REQUESTS = 3
DOWNLOAD_DELAY = 1
These two options are the common way to handle the throttling of your scraper. CONCURRENT_REQUESTS sets the number of threads making requests to the target server while DOWNLOAD_DELAY sets the fixed delay in seconds between two requests from the same thread.
If you need a variable pause between the requests, instead of using these options we can turn on the AUTOTHROTTLE.
AUTOTHROTTLE_ENABLED = True
# The initial download delay
AUTOTHROTTLE_START_DELAY = 5
# The maximum download delay to be set in case of high latencies
AUTOTHROTTLE_MAX_DELAY = 60
# The average number of requests Scrapy should be sending in parallel to
# each remote server
AUTOTHROTTLE_TARGET_CONCURRENCY = 3.0
# Enable showing throttling stats for every response received:
AUTOTHROTTLE_DEBUG = False
In this case the delay will vary, depending from the latency of the target website.
From the Scrapy documentation:
AutoThrottle algorithm adjusts download delays based on the following rules:
1. spiders always start with a download delay of AUTOTHROTTLE_START_DELAY;
2. when a response is received, the target download delay is calculated as latency / N where latency is a latency of the response, and N is AUTOTHROTTLE_TARGET_CONCURRENCY.
3. download delay for next requests is set to the average of previous download delay and the target download delay;
4. latencies of non-200 responses are not allowed to decrease the delay;
5. download delay can’t become less than DOWNLOAD_DELAY or greater than AUTOTHROTTLE_MAX_DELAY
Last but not least, we will set up the default request headers, copying them from the inspect tab of the browser.
DEFAULT_REQUEST_HEADERS = {
':authority': 'books.toscrape.com',
'accept': 'text/html,application/xhtml+xml,application/xml;q=0.9,image/avif,image/webp,image/apng,*/*;q=0.8,application/signed-exchange;v=b3;q=0.9',
'accept-language': 'en-US,en;q=0.9',
'cache-control': 'max-age=0',
'dnt': '1',
'sec-ch-ua': '"Google Chrome";v="105", "Not)A;Brand";v="8", "Chromium";v="105"',
'sec-ch-ua-mobile': '?0',
'sec-ch-ua-platform': '"macOS"',
'sec-fetch-dest': 'document',
'sec-fetch-mode': 'navigate',
'sec-fetch-site': 'none',
'sec-fetch-user': '?1',
'upgrade-insecure-requests': '1',
'user-agent': 'Mozilla/5.0 (Macintosh; Intel Mac OS X 10_15_7) AppleWebKit/537.36 (KHTML, like Gecko) Chrome/105.0.0.0 Safari/537.36'
}
Unless specified differently inside the scraper, these headers will be used for all the requests inside the scraper. Again I’m mimicking here a request made by a Mac Desktop with Chrome Browser installed.
You may have noticed I didn’t copy the “accept encoding” option, this is because Scrapy handles it automatically, and adding it in the headers may cause some issues with the output format when compressed.
Creating The Spider
After launching the following command we’ll get an initial skeleton of a scraper.
scrapy genspider booksscraper toscrape.com
We are creating a scraper called booksscraper, that will be set to scraper the toscrape.com website and move only inside the toscrape.com domain.
import scrapy

class BooksscraperSpider(scrapy.Spider):
name = 'booksscraper'
allowed_domains = ['toscrape.com']
start_urls = ['http://toscrape.com/']

def parse(self, response):
pass
With this setup, the scraper starts from the list of urls inside the start_urls variable and then executes the parse function.
The other way a Scrapy spider could start is the following:
import scrapy
from scrapy.http import Request

class BooksscraperSpider(scrapy.Spider):
name = 'booksscraper'
allowed_domains = ['toscrape.com']

def start_requests(self):
start_urls = ['http://books.toscrape.com/']
for url in start_urls:
yield Request(url, callback=self.parse)

def parse(self, response):
pass
Instead of starting from the start_urls list, the scraper starts from the start_request function and we have more options to differentiate the calls for every URL in the starting URLs, as an example, we could assign a different cookie jar to every URL.
Requesting The Items
Now we are on the home page of the website and we have two separate tasks:
- iterate on every book on the page, extracting for every book its page URL
- iterate on every page until page 50, the max number.
For both of them, I will use XPath selectors, since I personally find them more readable, and more complete even if, from what I read online, they are less performing than CSS ones.
We’re not entering in details on how XPath or CSS selectors work on this tutorial but will surely do in one of the future posts.
Let’s start by extracting the data from the books on the first page of the website.
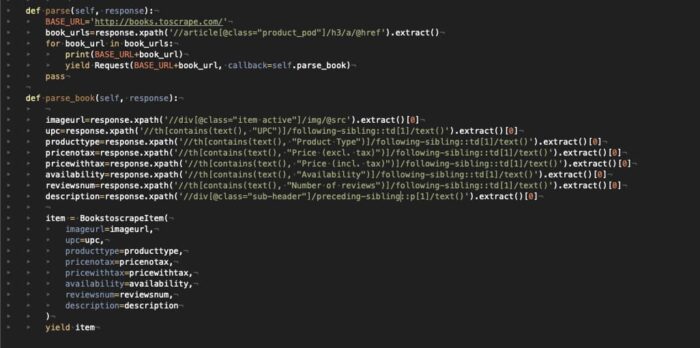
Excluding the image URL and the description, all the other data is inside a table without a particular ID, so we’ll need to use the text label of each row of the table to extract the corresponding value.
The result is what you can see in the picture below (I’m attaching the image of the code for formatting and readability reasons now).
For every book scraped, we will create a BooktoscrapeItem, where every field is populated by the result of our XPATH selectors and the function parse_book return this item as a result.
The second step of the scraper, which iterates on the pages of the catalog, is handled by simply finding the tag of the “next page” link and then calling again the parse function on this new page.
Now we can finally call our scraper with the command
scrapy crawl booksscraper -o test.json -t json
and we’ll get a test.json file inside the project directory, containing a JSON with the items scraped. I’ve used JSON as an output format but there are different options, just have a look at the documentation to see what fits better for you.
P.S: you will see running the scraper that there will be several 404 errors, this is because the URLs of the following pages and of the books are not consistent, but it does not matter for the purpose of this short tutorial.
I hope you have found useful this small tutorial on web scraping with Python. Read more at this link – GitHub repository code and for any questions you can reach the community on our Discord server or contact me via email at [email protected]
This article was kindly provided by Pierluigi Vinciguerra, web scraping expert and founder of Web Scraping Club. Follow this link to see the original post.
Download GoLogin here and explore the scraping world with our free plan!


